How to Cut the Hair on Your Dog's Pads

Written and verified by the psychologist Sara González Juárez
A dog’s pads are an essential part of its anatomy and require specific care, such as occasionally trimming the fur that grows between the toes. Usually, all dogs that need a visit to the hairdresser to keep their fur in good condition receive this attention, but what if you want to do it at home?
Cutting the hair on a dog’s pads isn’t a simple task and must be carried out with appropriate material and in a specific way that we’ll tell you here. This part of the body is usually one of the most forgotten about; however, it’s essential to keep your pet’s legs and paws healthy so it can move without any problems. Read on!
Why do you have to cut the hair on your dog’s pads?
Dogs don’t wear shoes. This is a very obvious statement, but sometimes we forget that their paws are in contact with everything on the floor: dirt, microorganisms, glass, parasites, and much much more. Checking their pads and the space between their toes is vital in order to detect possible lesions in this area.
The pads cushion the impact of the footprint and distribute the weight of the body between the 4 limbs.
Hair grows between the pads and this can be short and barely visible or elongated until it almost covers the toes. This isn’t necessarily a bad thing, although it’s true that it can be a trap for debris from the floor, such as the dreaded spikes. On the other hand, if your dog has very long hair, it may form annoying knots or even make them limp.

How do I cut the hair on my dog’s pads?
If you decide to trim these hairs in your own home, here’s a guide to everything you need to do it safely. It’s not a difficult procedure, but keep in mind that not all dogs like to have their paws handled, so it should be done with caution.
Materials needed
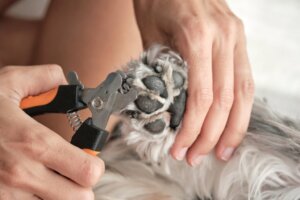
Pad hairs can be trimmed with scissors or clippers. We always recommend clippers, as they’re much safer and more precise machines, especially if the dog moves a lot during the process.
If you still opt for scissors, make sure they have a blunt tip to avoid sharp injuries. Ask for help to hold the paws firmly and, at any sign of the animal making a sudden movement, remove the scissors as quickly as possible.
If you use clippers, make sure you get a specific one for dogs. Most clippers are available with different heads for different parts of the body. They also make them in smaller sizes, much more ergonomic, and specialized for trimming hair in delicate areas, such as the pads.
Other materials you need to have on hand are gauze, disinfectant, and hemostatic powders. If you accidentally cut a pad, the bleeding will be heavy and you’ll have to put pressure on the wound until the bleeding stops. The hemostatic powders are very useful to finish plugging the wound, but go to the vet if it’s serious.
Steps to follow
Before starting the grooming session, it’s recommended you get the dog used to the materials you’re going to use, especially if it’s very nervous or afraid. To do this, gradually accustom it to the restraints that you’re going to have to carry out, as well as the noise of the scissors or the proximity to the clippers.
Every time your dog calms down or stays still, reward them, and repeat the process until they get used to it.
Once you’ve done this, which makes the process much easier, you can start with the haircut. The steps are as follows:
- Make a gentle first pass with the clippers, from the central pad to the digital pads. This will clear the paw and you’ll be able to see the pads.
- Separate your fingers from the central pad. This way you can move the clipper through the part where the toes bend, introducing it carefully. Alternatively, you can do it the other way round, i.e. from the toes towards the center pad.
- Repeat the process between the pad of each finger. Carefully separate the fingers and trim a little more hair from each space. Be careful not to overdo it, as you could hurt your dog unnecessarily.
Post-cut care
This cutting operation shouldn’t take more than a few minutes. Afterwards, and if the dog is still calm, you can take the opportunity to trim the nails and moisturize the pads with a wax or specific sprays.
Be sure to inspect the entire paw after the cut in case you’ve missed any small injuries. If you find any cuts or scrapes, disinfect the area well with diluted chlorhexidine and cover it if necessary. If it doesn’t stop bleeding or you see signs of infection after a few days, go to the vet immediately.
Remember to clean the clippers after each use so that hairs don’t build up inside and damage the clippers. Each machine is usually equipped with the necessary materials for its maintenance, such as the brush, lubrication, and the different blades. If you have any questions, ask the supplier about the maintenance and replacement of the heads.

In any case, it never hurts to visit a dog groomer from time to time. These places don’t only look after the aesthetic parts of an animal, but also have specific materials and products to take care of the skin and hair health.
A dog’s pads are an essential part of its anatomy and require specific care, such as occasionally trimming the fur that grows between the toes. Usually, all dogs that need a visit to the hairdresser to keep their fur in good condition receive this attention, but what if you want to do it at home?
Cutting the hair on a dog’s pads isn’t a simple task and must be carried out with appropriate material and in a specific way that we’ll tell you here. This part of the body is usually one of the most forgotten about; however, it’s essential to keep your pet’s legs and paws healthy so it can move without any problems. Read on!
Why do you have to cut the hair on your dog’s pads?
Dogs don’t wear shoes. This is a very obvious statement, but sometimes we forget that their paws are in contact with everything on the floor: dirt, microorganisms, glass, parasites, and much much more. Checking their pads and the space between their toes is vital in order to detect possible lesions in this area.
The pads cushion the impact of the footprint and distribute the weight of the body between the 4 limbs.
Hair grows between the pads and this can be short and barely visible or elongated until it almost covers the toes. This isn’t necessarily a bad thing, although it’s true that it can be a trap for debris from the floor, such as the dreaded spikes. On the other hand, if your dog has very long hair, it may form annoying knots or even make them limp.
How do I cut the hair on my dog’s pads?
If you decide to trim these hairs in your own home, here’s a guide to everything you need to do it safely. It’s not a difficult procedure, but keep in mind that not all dogs like to have their paws handled, so it should be done with caution.
Materials needed
Pad hairs can be trimmed with scissors or clippers. We always recommend clippers, as they’re much safer and more precise machines, especially if the dog moves a lot during the process.
If you still opt for scissors, make sure they have a blunt tip to avoid sharp injuries. Ask for help to hold the paws firmly and, at any sign of the animal making a sudden movement, remove the scissors as quickly as possible.
If you use clippers, make sure you get a specific one for dogs. Most clippers are available with different heads for different parts of the body. They also make them in smaller sizes, much more ergonomic, and specialized for trimming hair in delicate areas, such as the pads.
Other materials you need to have on hand are gauze, disinfectant, and hemostatic powders. If you accidentally cut a pad, the bleeding will be heavy and you’ll have to put pressure on the wound until the bleeding stops. The hemostatic powders are very useful to finish plugging the wound, but go to the vet if it’s serious.
Steps to follow
Before starting the grooming session, it’s recommended you get the dog used to the materials you’re going to use, especially if it’s very nervous or afraid. To do this, gradually accustom it to the restraints that you’re going to have to carry out, as well as the noise of the scissors or the proximity to the clippers.
Every time your dog calms down or stays still, reward them, and repeat the process until they get used to it.
Once you’ve done this, which makes the process much easier, you can start with the haircut. The steps are as follows:
- Make a gentle first pass with the clippers, from the central pad to the digital pads. This will clear the paw and you’ll be able to see the pads.
- Separate your fingers from the central pad. This way you can move the clipper through the part where the toes bend, introducing it carefully. Alternatively, you can do it the other way round, i.e. from the toes towards the center pad.
- Repeat the process between the pad of each finger. Carefully separate the fingers and trim a little more hair from each space. Be careful not to overdo it, as you could hurt your dog unnecessarily.
Post-cut care
This cutting operation shouldn’t take more than a few minutes. Afterwards, and if the dog is still calm, you can take the opportunity to trim the nails and moisturize the pads with a wax or specific sprays.
Be sure to inspect the entire paw after the cut in case you’ve missed any small injuries. If you find any cuts or scrapes, disinfect the area well with diluted chlorhexidine and cover it if necessary. If it doesn’t stop bleeding or you see signs of infection after a few days, go to the vet immediately.
Remember to clean the clippers after each use so that hairs don’t build up inside and damage the clippers. Each machine is usually equipped with the necessary materials for its maintenance, such as the brush, lubrication, and the different blades. If you have any questions, ask the supplier about the maintenance and replacement of the heads.
In any case, it never hurts to visit a dog groomer from time to time. These places don’t only look after the aesthetic parts of an animal, but also have specific materials and products to take care of the skin and hair health.
All cited sources were thoroughly reviewed by our team to ensure their quality, reliability, currency, and validity. The bibliography of this article was considered reliable and of academic or scientific accuracy.
- Castellanos, G. C., Rodríguez, G., & Iregui, C. A. (2005). Estructura histológica normal de la piel del perro (Estado del arte). Revista de medicina veterinaria, 1(10), 109-122.
- Dupuis, C. (2018). Peluquería canina para realizar en casa. Parkstone International.
- Baraboglia, E. R. (2012). Lesiones podales por espiguillas en el perro, su extracción y diagnóstico diferencial. REDVET. Revista Electrónica de Veterinaria, 13(9), 1-33.
This text is provided for informational purposes only and does not replace consultation with a professional. If in doubt, consult your specialist.